Tag: #sewing


Marc Jacobs never looked so lovely!

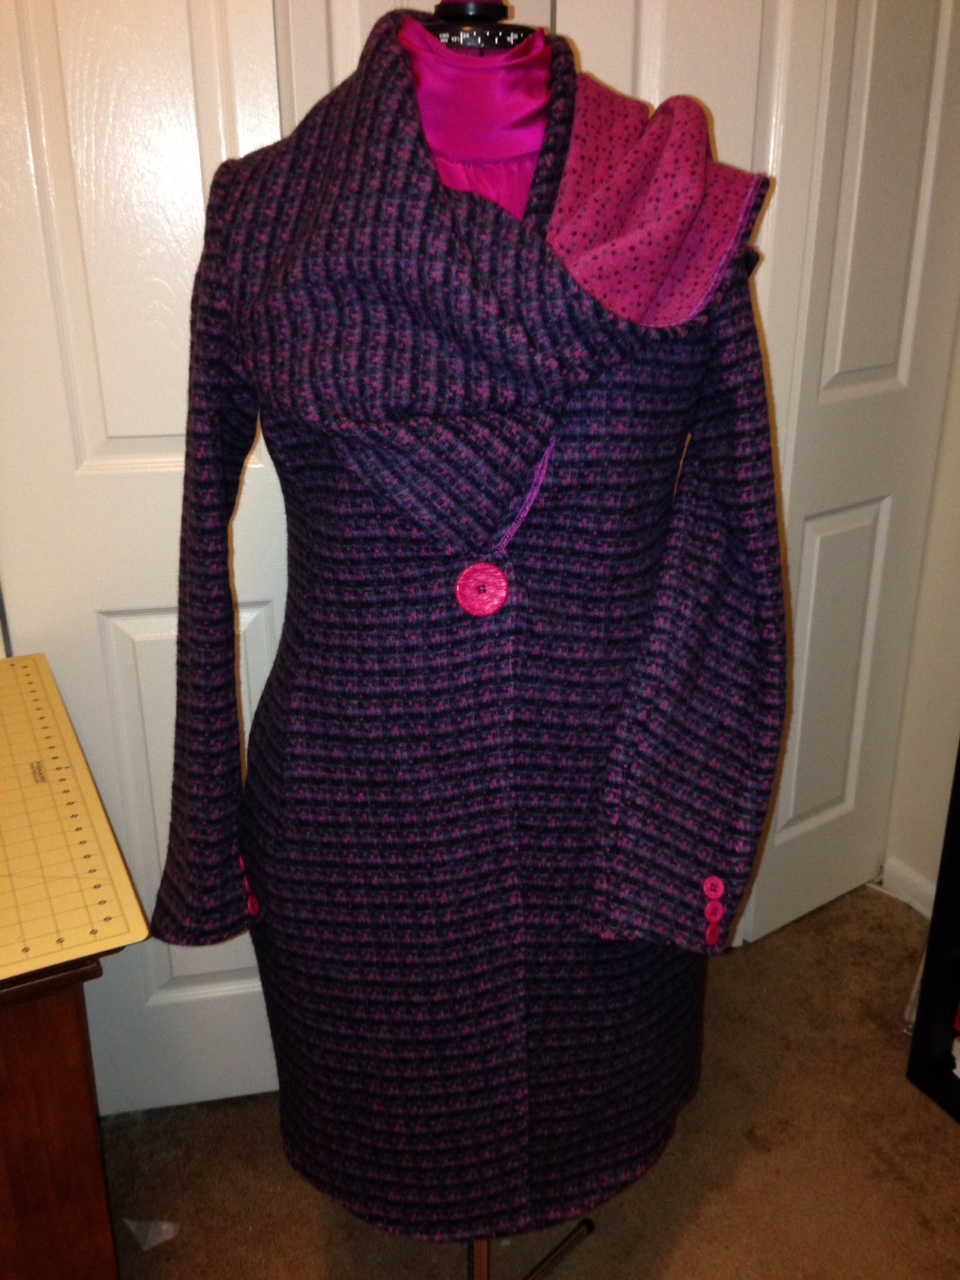
I love love love this reversible fabric by Marc Jacobs.. I knew I was obtaining a great piece of fabric when three women flagged me down in Mood Fabrics to find out where I got it and had suggestions on sewing it. I really had no intention on purchasing coat fabric when I went too Mood Fabrics in August.. right who sews for fall/winter in August when the temperature still says 88? And sure enough it did not happen and I created this beauty in October when the temperature dipped! On the dominate side is this beautiful grape stripe and on the reverse side is the hot pink and the grape peeking through with small dots! Matches great with the silk top I just created also found here.

Alterations, I made the hip wider by one inch on each pattern side because I did want the coat to close or look closed.  I added the huge button, there is a snap on the other side.  I added three smaller matching buttons to each sleeve and omitted the huge hook and eye for the drape.

More details on the pattern creation below:

Project Review Detailed

Pattern Description: Vogue Donna Karen Collection – loose-fitting unlined coat with drape and two-piece sleeves

Pattern Used: Vogue 1129
Pattern Sizing: 14 – altered

Did it look like the photo/drawing on the pattern envelope once you were done? Yes, just like the pattern but with alterations
Were the instructions easy to follow? Somewhat, it became a bit confusing when it came to attaching the drape.
What did you particularly like or dislike about the pattern? I was not too happy with how the drape instructions were described

Fabric Used: Marc Jacob two sided 100% Wool from Mood Fabrics
Pattern alterations or any design changes you made: Of course, had to alter the hip area

Would you sew it again? No I only need one coat like this!


First Fall/Winter Outfit Completed!

When I saw the skirt fabric in Mood Fabrics I knew I had to have it and I knew exactly what would become of it! It sewed like a dream and it has so many other colors to bring out of it.  While the dominate color is charcoal, I decide to pick up on the hot pink circles and make a beautiful silk top to go with it.  Koonan at Mood assisted picking out the fabric! He is such a doll! Below are my pattern reviews:

Project Review Detailed

Pattern Description: Top is McCalls loose-fitting pullover tops with gathered front neckline and the skirt is by New Look and is a set of peplum style skirts. I altered the skirt pattern to just a simple pencil skirt with back slit and overlooked the inside with the same color as the blouse.  Just to give it a peek-a-boo look on the inside. Besides why keep changing serger thread.. it really worked!

Pattern Used: McCalls 6650 and New Look 6003
Pattern Sizing: Cut a 10 for the top, 14 for the skirt

Did it look like the photo/drawing on the pattern envelope once you were done? Yes, just like it especially the top, once you made the neckline it was easy to make the sleeve cuffs and the waistband.. they are all created the same way.
Were the instructions easy to follow? Yes, the instructions were easy and clear.
What did you particularly like or dislike about the pattern? Nothing it constructed well

Fabric Used: Silk Crepe and 100% Boiled wool from Mood Fabrics
Pattern alterations or any design changes you made: Had to alter the hip area

Would you sew it again? Yes the top and the skirt again, the top has so many variations it will never look like the same blouse!

Too low too much to show!

Ok so here are the jeans that turned out OK except.. the fact that its way too low in the back! There are some other issues that appeared that I will describe below:

Pattern used: McCalls OOP 6404 slender legging pants in four styles
Fabrics used: Stretch Grey Denim from fabric.com with leather trim obtained from Michael Levine.
Pattern alterations: I took the front leg piece and divided it into four other pieces and quilted the top piece in the front and the back. I only altered the back piece into two pieces, added a gold metal zipper, and a leather band.


What should have been done:
Crotch area made higher in the back, bottom pants piece made at least three inches longer and slimmer at the bottom, the waistband increased by at least two more inches, and keep the metal zipper insertion.

I will make the pants again perhaps in another color or the same grey denim but applying the mentioned alterations.

Update: it was suggested that I remove the leather band, add a yoke with the left over quilted pieces I have and add a new leather band but larger.

My First CHANEL like Jacket


Finally finished the CHANEL like jacket. It took over 15 hours to create. Lots of hand stitching! More details here http://sipthediva.tumblr.com #picstitch #diy #seamstress #makingsewingsexy #sew #sewing #CHANELlike

Pattern Used: Vogue 7975 view B

Fabric: Lowest Price Fabric — no longer available; Boulce tweed

Part of this jacket is quilted by machine the front and back, partially hand-stitched lining obtained from G-Street.  The lining is very pretty with small paisleys, medium weight that covers the inside seams very well.

This fabric is very delicate as it frays as soon as its touched and / or stitched.  In essence the whole jacket receive interfacing including the sleeves.

Would I sew this again? Probably not as it did take over 15 hours plus to create. Including three hours of cutting!

I love it though and I cant wait to wear it, I will be wearing it with a similar blouse once I make it LOL

My jacket was also featured in Michael Levine’s newsletter on October 7, 2013. Yeaaah for me!

Update March 11, 2014 — Initially I said I would not make this jacket again, but since doing more research on this jacket I would certainly sew it again. In fact I have chosen the fabric for a summer style and conducted more research on the construction of it. I am sure it will take a lot longer than the originally as there are more techniques to incorporate to create this jacket.

Of course when I go to NY I can never stay on course with my list.. I always vear away and purchase other and extra fabric lol the prices are just fabulous.. Anyway this leopard print fabric was obtained at MOOD Fabrics.. Its a beautiful crisp hand knit, but it is a bit on the thin side.  I purchase another piece blended knit for the lining.  The pattern was easy and it sewed quickly.. more details below.. Soon as I get to wear it I will post a photo..lol

Project Review Detailed
Pattern Description: One style of pullover, close-fitting dress.  Designer – Tracy Reese
Pattern Used: Vogue 1314
Pattern Sizing: Cut a 12 for the top, 14 for the skirt
Did it look like the photo/drawing on the pattern envelope once you were done? Yes, just like it!
Were the instructions easy to follow? Yes, the instructions were clear.
What did you particularly like or dislike about the pattern? Nothing it constructed well
Fabric Used: 100% Boiled wool
Pattern alterations or any design changes you made: Had to alter the hip area
Would you sew it again? Maybe, I only wanted the pattern for this particular fabric.

I am falling in love with the idea of creating things with leather.  I found this piece of leather at G Street Fabrics in Rockville, Maryland. They are having a fabulous sale right now that can’t be passed up! In fact I am eyeing a Bernina machine that is on sale as well.. anyway I needed a good size Black leather clutch for a long time and to see this piece of patent embossed piece — was a must have.  It was a really large piece in which I utilized a great space of it, I lined it with a cotton/silk lining and interfaced the lining versus the actual piece of leather.  Although I did do a test piece of leather and I fused the interfacing to the leather, I thought it would be better to do the first option.

Stitching this required longer stitch lengths, and a walking foot.  I used Gutterman’s polyester thread and a regular all-purpose needle.

I measured the size I wanted onto pattern paper, then transferred to to the leather, the interfacing, then the lining.  I also cut a square lining pocket for the inside just to give it a more “professional look.”

I then measured the front 10” from the bottom and marked it with chalk, I stitched down that line. Then measured and marked another 10” to the back section and stitched down that line. The rest of 5” is the flap.  I then stitched up each side 5/8, tacked each end.  Then stitched around the flap, trimmed close to the edge of the stitching.  I then cut a 1” strip the length of the flap folded it over and stitched across the edge just for decoration purposes.

I used fray check around all the edges just so the little lining threads do not fray.  I will be looking for some other kind leather edge sealer to put on the sides.

Let me know how you like it .. subscribe to the blog or send me an email 😉

Verified by ExactMetrics