Tag: Gallery

Too low too much to show!

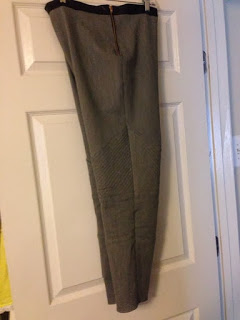
Ok so here are the jeans that turned out OK except.. the fact that its way too low in the back! There are some other issues that appeared that I will describe below:

Pattern used: McCalls OOP 6404 slender legging pants in four styles
Fabrics used: Stretch Grey Denim from fabric.com with leather trim obtained from Michael Levine.
Pattern alterations: I took the front leg piece and divided it into four other pieces and quilted the top piece in the front and the back. I only altered the back piece into two pieces, added a gold metal zipper, and a leather band.


What should have been done:
Crotch area made higher in the back, bottom pants piece made at least three inches longer and slimmer at the bottom, the waistband increased by at least two more inches, and keep the metal zipper insertion.

I will make the pants again perhaps in another color or the same grey denim but applying the mentioned alterations.

Update: it was suggested that I remove the leather band, add a yoke with the left over quilted pieces I have and add a new leather band but larger.

I am falling in love with the idea of creating things with leather.  I found this piece of leather at G Street Fabrics in Rockville, Maryland. They are having a fabulous sale right now that can’t be passed up! In fact I am eyeing a Bernina machine that is on sale as well.. anyway I needed a good size Black leather clutch for a long time and to see this piece of patent embossed piece — was a must have.  It was a really large piece in which I utilized a great space of it, I lined it with a cotton/silk lining and interfaced the lining versus the actual piece of leather.  Although I did do a test piece of leather and I fused the interfacing to the leather, I thought it would be better to do the first option.

Stitching this required longer stitch lengths, and a walking foot.  I used Gutterman’s polyester thread and a regular all-purpose needle.

I measured the size I wanted onto pattern paper, then transferred to to the leather, the interfacing, then the lining.  I also cut a square lining pocket for the inside just to give it a more “professional look.”

I then measured the front 10” from the bottom and marked it with chalk, I stitched down that line. Then measured and marked another 10” to the back section and stitched down that line. The rest of 5” is the flap.  I then stitched up each side 5/8, tacked each end.  Then stitched around the flap, trimmed close to the edge of the stitching.  I then cut a 1” strip the length of the flap folded it over and stitched across the edge just for decoration purposes.

I used fray check around all the edges just so the little lining threads do not fray.  I will be looking for some other kind leather edge sealer to put on the sides.

Let me know how you like it .. subscribe to the blog or send me an email 😉

This fabric was a dream to sew! It cuts with ease, drapes nice, does not slip when you stitch it or slip when the serger touches it. Its nice and soft and feels good on the body — has good body for sewing.

Project Review Detailed

Pattern Description: Very Easy Vogue Top (quarter and long sleeves), pants and skirt
Pattern Used: Vogue 8935
Pattern Sizing: I cut the 8 top and the 14 skirt adding about an inch in the hip line.
Did it look like the photo/drawing on the pattern envelope once you were done? Yes, I would say so
Were the instructions easy to follow? Yes, the instructions were clear.
What did you particularly like or dislike about the pattern? Nothing it constructed well

Fabric Used: Jersey knit with lycra from Chic Fashions fabric house
Pattern alterations or any design changes you made: Yes I used the shorter top with long sleeves
Would you sew it again? Maybe I am not sure why I would need two of these sets..

Complete McCalls 6083 E Jumpsuit, this was fun to make. I made a light blue leather belt with three knots in the middle to match.

Project Review Detailed Pattern Description: Misses Tops with variations
 Pattern Used: McCalls 6084 Pattern Sizing: I cut the 8
 on the top, 14 bottom

Did it look like the photo/drawing on the pattern envelope once you were done? Yes I would say so


Were the instructions easy to follow? Yes, the instructions were clear.


What did you particularly like or dislike about the pattern? The crotch was a bit short, I had to adjust the waist. If I sewed it again to would make the bodice longer.

Fabric Used: Stretch striped denim— Mood Fabrics NYC


Pattern alterations or any design changes you made: Created more width in the hip area.

Would you sew it again? Yes might make the halter view in pants.

Would you recommend it to others? Yes, cute jumpsuits in long and short pant variations.


This is the last installment on the wrap top project.  The first photo you see is the completed top.  The second photo you see are the pleats on the inside of the right side of the wrap.  The third photo shows the surged seam layers, and the last photo is the peplum attached to the bodice.
I do have to say although I found this fabric a bit challenging to sew, the results came out fabulous and it fits well! I would sew this top again but I would make some very minor adjustments.  1. I do not like the sleeves so wide nore meeting at the top of my watch, I would like these sleeves to be a bit longer.
Project Review Detailed
Pattern Description: Misses Tops with variations
Pattern Used: New Look 6755
Pattern Sizing: I cut the 8
Did it look like the photo/drawing on the pattern envelope once you were done? Yes I would say so
Were the instructions easy to follow? Yes, the instructions were clear.
What did you particularly like or dislike about the pattern? I did not like the sleeve to be short and I wuld have preferred the sleeve slimmer.
Fabric Used: Italian Knit — Mood Fabrics NYC
Pattern alterations or any design changes you made: None
Would you sew it again? I would sew it again in knit and extend the sleeves a bit.
Would you recommend it to others? Yes, cute pattern with different top variations.


Ok here is the first project from the NY Fabric Spree .. It’s a long sleeve wrap top made out of the camouflage color Italian knit.
Love love love the fabric… I was not exceptionally fond of sewing it 🙁 The fabric is beautiful but difficult to handle since it was so thin… Pins really did not help as they would slip out… so I had to take total control. I did not use a walking foot I just sewed it slowly guiding each piece as I stitched it on the machine.  As I mentioned in the previous blog, my serge was not fond of it either as surging a single layer just did not work.  As long as I surged TWO pieces of fabric it worked well…
However, in these photos you see the initial layout of the pattern — New Look 6755 I choose view C as I wanted long sleeves with no collar… the top will be worn with a tank underneath and the camouflage shorts that are next on the cutting table.
Since I am small on the top and in the waist, my measurements pretty much measured up with the pattern. This pattern calls for woven fabrics not knits, so I knew I would need to cut a smaller size… these pattern pieces are a size 8.  I pinned each pattern piece onto the mannequin for a proper fit and any adjustments prior.  Luckily I did not need any at the waist or the bust.  The last photo you see is the completed bodice. 
The rest of the top will be blogged later.

Verified by ExactMetrics