Tag: sewingwithleather

Silk and Leather…


This is the last in the series of photos that were taken in November, unfortunately I don’t have access to rest of them to share .. More will be taken soon hopefully this week as the weather breaks and I have someone available to take them for me..


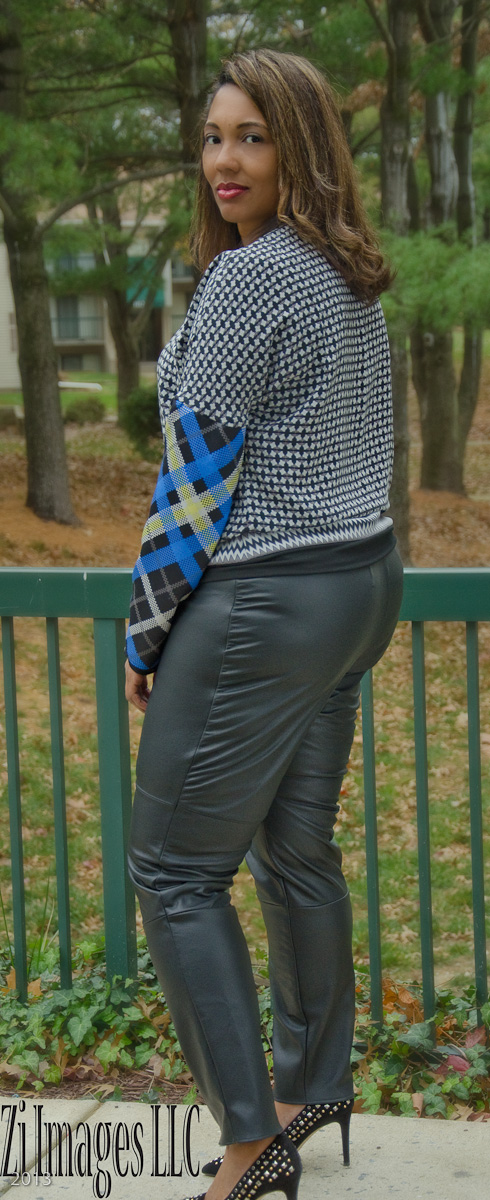
This outfit is created from 100% silk and 100% Leather.  The silk was obtained from Mood Fabrics and can be found here. The leather was one big hide I think about 23 sq. ft. and that was obtained from Tandy Leathers in Essex Maryland.

The pattern used for the sweatshirt was Vogue 8877 with alternations noted below and the pants were made from McCalls 6404 altering a few of the pieces.

For the shirt I made it a true sweatshirt by adding ribbing to the neck, sleeves, and bottom of the shirt to give it the bunching look.  The bodice of the shirt was also cut on the salvage as it gave the shirt more character, the sleeves were cut from a different silk.

The pants I cut the legging pieces straight instead of diagonal like view C.  Since this leather does not stretch as recommended on the pattern I should have cut it a hair bigger. Some leather is just like woven fabric they do not stretch. If you get it wet you might find it will stretch but it does not bounce back into shape like a true knit fabric.

Would I create the pants again, yes as the style of the legging have lots of character and design alternatives? Another lux sweatshirt maybe not..

Shoes: JCrew
Hair and Highlights: Kier Ross-Johnson for Bangz Hair Salon Montclair NJ


Chanel Coat Inspiration

When I saw this Chanel Coat in the online fashion show I knew I had to have it or I knew I had to make one like it. I was more than sure the cost of this coat would be about $4,200 whew too rich for me.. However, when the collection was released, I couldn’t wait until I found out the REAL Price :-O

Umm yeah that will never happen unless I hit the $455 Million Dollar lottery currently going on! Heck that price can purchase the Bernina 560 I need, two student machines and fabric for my ready-to-wear.. anyway I digress.. here is my actual creation from this inspiration..

This is a beautiful 100% Wool Tweed from Mood Fabrics I purchased mine at the store in New York but there is a similar one Here.  I used Burda pattern 7020 with the following modifications:
Added 2″ to sleeve and added a fringed self fabric band
Added a waist casing for the leather belt
I obtained the leather belt (which is simply a leather tie by the yard) from ToHo Shoji Trimmings in New York along with the Swarovski Balls on the end of the leather tie.
I loved making this coat! My client was so amazed when she saw it and want to purchase it from me..lol
Dets on the rest of the outfit:
Leather pants DIY (details coming soon)
Suede Hills with studs — JCrew
Ring DIY (details coming soon)
More coming soon 🙂

Too low too much to show!

Ok so here are the jeans that turned out OK except.. the fact that its way too low in the back! There are some other issues that appeared that I will describe below:

Pattern used: McCalls OOP 6404 slender legging pants in four styles
Fabrics used: Stretch Grey Denim from fabric.com with leather trim obtained from Michael Levine.
Pattern alterations: I took the front leg piece and divided it into four other pieces and quilted the top piece in the front and the back. I only altered the back piece into two pieces, added a gold metal zipper, and a leather band.


What should have been done:
Crotch area made higher in the back, bottom pants piece made at least three inches longer and slimmer at the bottom, the waistband increased by at least two more inches, and keep the metal zipper insertion.

I will make the pants again perhaps in another color or the same grey denim but applying the mentioned alterations.

Update: it was suggested that I remove the leather band, add a yoke with the left over quilted pieces I have and add a new leather band but larger.

I am falling in love with the idea of creating things with leather.  I found this piece of leather at G Street Fabrics in Rockville, Maryland. They are having a fabulous sale right now that can’t be passed up! In fact I am eyeing a Bernina machine that is on sale as well.. anyway I needed a good size Black leather clutch for a long time and to see this piece of patent embossed piece — was a must have.  It was a really large piece in which I utilized a great space of it, I lined it with a cotton/silk lining and interfaced the lining versus the actual piece of leather.  Although I did do a test piece of leather and I fused the interfacing to the leather, I thought it would be better to do the first option.

Stitching this required longer stitch lengths, and a walking foot.  I used Gutterman’s polyester thread and a regular all-purpose needle.

I measured the size I wanted onto pattern paper, then transferred to to the leather, the interfacing, then the lining.  I also cut a square lining pocket for the inside just to give it a more “professional look.”

I then measured the front 10” from the bottom and marked it with chalk, I stitched down that line. Then measured and marked another 10” to the back section and stitched down that line. The rest of 5” is the flap.  I then stitched up each side 5/8, tacked each end.  Then stitched around the flap, trimmed close to the edge of the stitching.  I then cut a 1” strip the length of the flap folded it over and stitched across the edge just for decoration purposes.

I used fray check around all the edges just so the little lining threads do not fray.  I will be looking for some other kind leather edge sealer to put on the sides.

Let me know how you like it .. subscribe to the blog or send me an email 😉

So I have received a few inquires on “what” I have learned..
I purchased this piece of leather from Michael Levine Fabrics in LA without really knowing much about leather, but I was sure I needed an orange clutch lol
First this piece is extremely soft, easy to cut, and easy to sew. its like butter.  Actually its so easy to cut that it will stretch on you.  I used regular all-purpose thread and a regular needle. I did not need to use a leather needle because the leather is not tough.  Also you can iron this leather as long as you have a piece of muslim (which is cotton) inbetween the iron and the leather.  You can not leave the iron on the leather long as it might burn.
I did make a mistake in the sewing process and had to remove a seam, it was very easy as long as I was really careful, took the threads out on the top side — about every three stitches then just pulled the bobbin thread.
Know what you want to construct! I did use a guide of a BCBG purse but mine came out much small which is ok for me as I can still fit my iPhone and fold up flip flops in it.
The snap I feel might be too heavy for this leather, the leather is very soft and its has no structure to it at all.  Although I was strongly advised to NOT use a stablizer or interface; the bag needs it.  The leather is very soft and its flimsey.. not really what I want in a clutch but its too late to reconstruct.  I did add seams to the side (its was a suggestion by an instructor) to give it more stablity, that did not really help.
For sure I will create another bag, and another from leather.. but I will do more research and use a stablizer if I am working with this type of leather again.

My first piece of leather.. I learned a lot of lessons with this lol I will definitely create another ☺#picstitch #diy #sew #sewing #sewingwithleather

Verified by ExactMetrics